Other
-
12/07/2024
What is this for?
This tutorial is for The Wand Company's Fallout TV Show Diecast Pipboy 3000 MkV. This is one hell of a replica and I highly recommend it as it is built with modding in mind and has the ability to easily recieve updates from TheWandCo. from this website!
I did email them asking for some more information on when updates are coming out and what we may see and it appears that they do plan to try and add the ability to easily add music and other radio stations in the future but for now we have to do this the fun way!

An Update from the Good Ol' Reddit!
I posted this to reddit and someone commented with their website with a ton more in depth information and a lot more customization options with documentation that also includes writing your own apps to the Pipboy!
So if any of that seems exciting to you, by all means, please check out their website here!
Don't want to open your Pipboy?
Need not worry, once again my reddit posts are garnering attention and another Redditor posted their website which allows you to replace current radio files and play them just by connecting your Pipboy to your computer and loading the website!
It may not have all the same possibilities as opening it up does, but it works perfectly for those that don't or can't open theirs up! Check it out here!
Read before you do this!
This will require you to open your pipboy up to get to the Micro SD card located behind the screen. You will also more than likely need a bigger Micro SD card as the Pipboy comes with a 256mb SD card which is not enough for more than a handful of songs. The Pipboy needs an SD Card running Fat16 so you'll only be able to use a 4gb SD card, I recommend this one from amazon.
Other than all of that you will need a computer with a Micro SD card slot or a SD to Micro SD Card converter.
Accessing the Micro SD Card
This is moderately simple, you'll just need to remove the cuff on the inside of the screen side of the pipboy then remove the black cover that goes over the screws. After that remove the batter cover and make sure to unplug your battery as if you don't you will risk the chance of breaking the connector when taking the faceplate off.
After removing the battery there are four screws in each corner around the battery compartment, remove these and the front should come off. BE WARNED THOUGH, the front is connected in a few spots to the rest of the body so make sure to set the pipboy screen down when removing these screws to prevent any issues when opening it up.
You should be able to see the SD card on the back of the board on the back of the screens module. Just remove it and plug it into your PC!
Important info before adding files
To actually add music to the pipboy you have to name the files very specifically. If you don't it won't read them and will just error out. The first folder you'll need to access after you've got your SD Card for the music is the RADIO folder, in there you will see 4 file types: DX, MX, SFX, and TUNING.
You will need at least one of all of these files for this to work, if you don't want some of the specific sound effects to play you can just replace the files with one file with at least 1 second of nothing playing and it'll still work. I have included a 1 second .wave file in the downloads section at the bottom of the page.
Onto the file info
DX is for the host to talk before the song starts, I removed these and replaced it with one single file with 1 second of nothing playing as I included DJs in all of the song files so these were pointless but you could totally replace them with ads if you want them to play before all of your music.Converting the Music
Just a heads up before you read all of this, I will be explaining how to use the programs I used. You can definitely use any program that can do the same tasks as these if you want, but I already have and know how to use these.
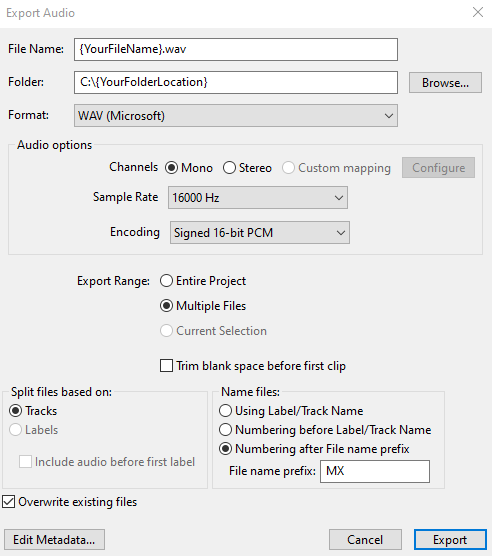
First off You'll need a program to convert the music to the correct format as the Pipboy requires 16bit Mono .wav files. I recommend using Audacity and bulk converting all music by dragging them all into your program and then exporting them with the settings shown in the image below:

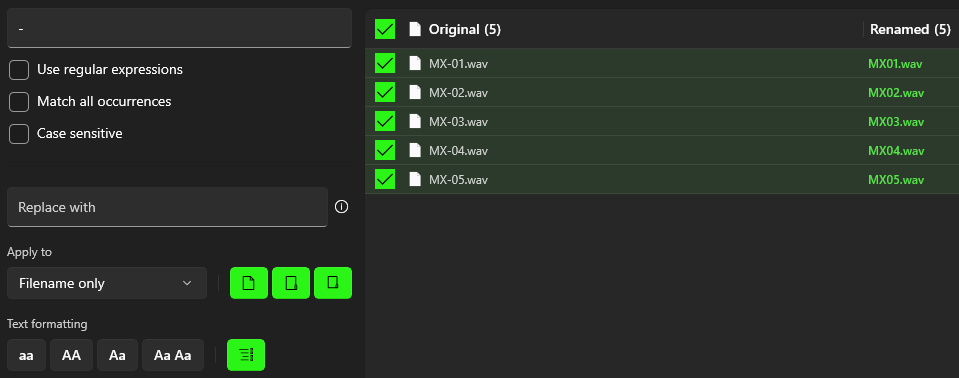
I also recommend Bulk renaming them with Windows Powertoys or another bulk renaming program but I will be basing this on windows powertoys as that's what I used. After exporting from Audacity with the settings above, the file names should look like "MX-??.wav".
To rename with Powertoys you will need to select all of the files and right click then click "Rename with PowerRename". All you'll have to do now is remove the "-" from the file names and you should be set! To do this in powertoys you can copy the settings from this:

Finalizing Everything
Once your files are converted and named all you have to do is add them into the RADIO folder then put the SD card back into the pipboy and reassemble it! I do recommend testing it before putting it back together first by closing the shell and plugging in the battery. Once on just click through the music a few times to make sure it is playing the music and doesn't error out.
Once it's together and all your music is added you can enjoy your newly added music during your adventures. Don't forget to grab a nice cold Nuka-Cola before heading out on your next wasteland adventure!
Want to revert it back?
You can easily revert everything by going to the Update website for the Pipboy which can be found here!
Notes
No Notes to Display, check back later!